Read the transcript of the lecture
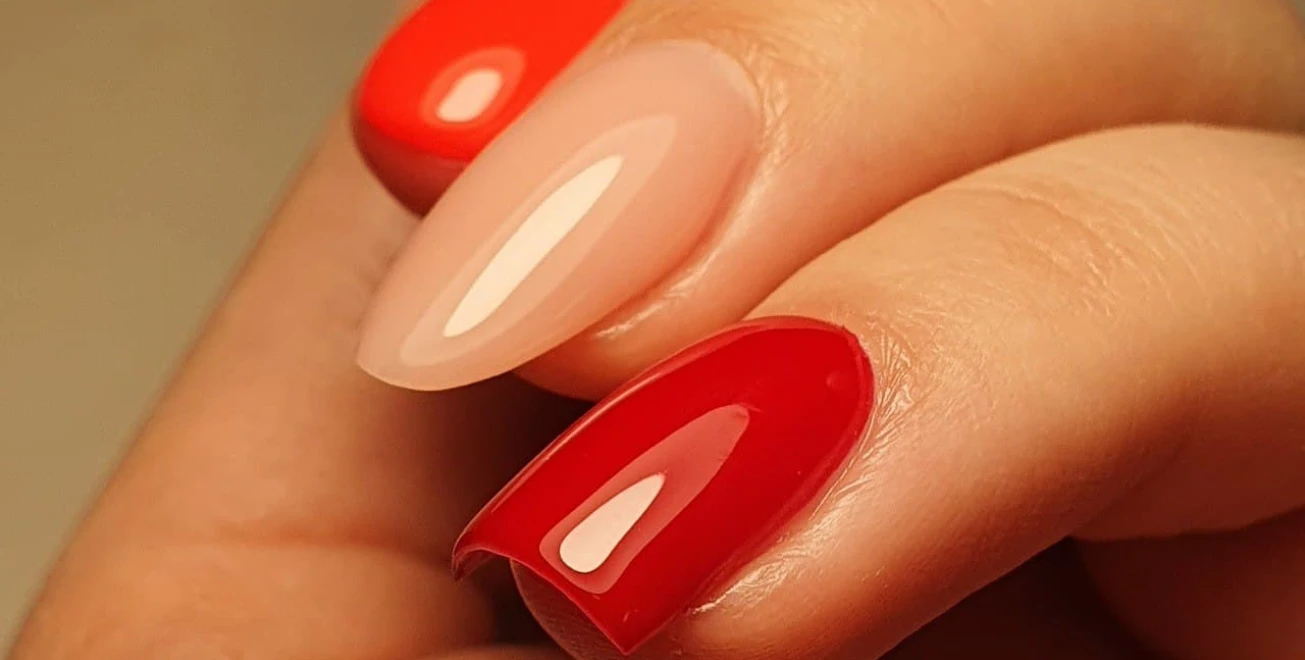
The base for the next sample will be a dark boric slightly fuchsia camouflage.
This is the 386 colour of the beer.
I also applied two coats on the top, unbound.
And if you observe the pattern, you'll see that we have a Well in the middle, however, we have our transferphora in the regular wider tab.
To save you the trouble, it's a good idea to work on the two sides where you don't want the halo to go, We'll flatten it, and you, we'll use the sticky layer of gillag to make a resin paper for our frieze.
So we don't need any extra material to apply our fouling.
So it's very, very convenient, because you don't have to buy materials again.
So we're going to take our matte topcoat and we're going to coat both sides of the tit.
We'll make sure we paint roughly straight sides, with a buffer.
And where it's matte of course the foil won't stick to it, and where it's glossy, in this case it's sticky because I used 3-step gellac, And it's going to adhere nicely there.
Now, this page is a little bit up, so we'll compensate for that there with the sticker.
When we're done, we'll put it in the lamp, tie it off completely, and then we can take out our foil.
I'm using Mojra's transfer foil.
This is Easy Transfer Folia colour 2, a shade of bad gold.
I always try to waste the least amount of it, I'm going to waste some anyway, I always work by cutting it off with a pair of template cutting scissors I'm going to take the amount that I think is optimal for a sample, and I'm going to set the rest aside so it doesn't get all mushy, and then I'll be pretty good with that.
You can take care of it I think.
And then we'll need more after this, I'll show you how to use a decorative strip.
I also chose a Rosgold shade of it.
By the way, this trim strip is on several of the marquees, I'll link it in the same way to the mother viscose, and then you can find out specifically what colours you're looking for.
Okay, so these are two of the things we need, I'll tell you the rules in a minute, because we'll have to work with it, To make it last.
Okay, take it out of the lamp and you can see that the edges of the pattern look like they're completely faded in, and then the middle part is left shiny.
Then we're going to wrap our foil, we don't have to wipe anything off, we're going to stick the white side of the surface, we're just going to press it on like that, And we'll start going from, say, top to bottom, but you can stick it all together, it doesn't matter.
I'm not going to cover it 100%, but let's say 98%, so it's going to cover it pretty well, but not perfectly.
And then you see, it's done, it's beautifully adhered, and I don't actually save any of this, if you like, of course you can put it away, But at this point, we may have touched the sticky surface where it's still white, so the fuzz hasn't come off the moonshining paper, And that way it might come out better, it won't stick so easily, I don't do this anymore, I throw this out.
And then we'd cover the surface with two coats, but this time we're going to apply our sticker right away for a change.
For the sticker, to get this to stick nicely to the surface, there are two essential points.
One is to work on a mat surface.
You'll see I'm going to put it here on the edge where it's already matted, and a little bit on me so that it's on the foil is fine, But the important thing is not to stick it on a shiny or sticky surface, it can't really stick to that.
Also, one more important rule, is that you should run the sticker many times to the full edge of the nail.
So you need to cut about 1-1mm in, either at the side folds or at the free edge or at the base, so that the coin gel that goes on can seal it.
the edge completely.
You'll always have to seal the top with two coats, and then it'll be totally permanent.
We'll take a pair of tweezers.
And I used a thicker strip like this, the thickest one here, so I've got a really big selection already because I've used it up, So we'll use our tweezers to pick up the sticker, preferably not a new one, so we don't grease the surface of the tapado, we'll cut one off, Well, I always make one of these a little bit bigger, just to make sure we've got enough on the surface, we'll go over it with the chisel, and then we'll be able to touch it up with the With our new one for the surface, just not for the taped surface, the top of this one is.
We're going to glue it to the edge here, to compensate for the fact that it might be a little wavy around the edge, I'm going to glue it to the middle, I'll stick it there and then I can adjust the direction if necessary.
So you can see, you can pull it a little bit to the left, to the right, we'll glue it on, I'll release the tear from the bottom, I've got it, and I'll check to make sure it's hanging.
I'll just pull it a little bit to the right, and then I think we're good.
I haven't even glued it all the way on yet, because you have to trim the edges.
And then, like I said, we'll cut a little bit in.
Obviously, it's not very important here on the tip.
Now, for the nails, you're going to cut a little bit deeper than that, okay? So I'm not even going to go into it up here, but it's very important that if you're working on a real guest, you pay attention to this.
I then press it onto the surface really well.
The edges, too.
Of course, that's also very important.
And once we're done with that, we can seal it all off with two coats of gloss.
Also on a guess, I say it's not that important.
And then for that, we've made such a really super elegant base, I think.
The burgundy gold is very nicely shown with each other.
Okay, he's hit the lamp.
You can turn this so that when you glue the foil to the surface, that there's a tiny bit of glitter on the matte part of it.
Not one of those big foil additions, but a tiny bit of glitter.
To make sure it doesn't stay there, don't smear it with coin jelly straight away, but smear it with a lint-free wipe or clinjer, for example, Or if you've got this on your hands right now, this is my trace, this is my cleaning pad, you might as well use that.
The main thing is to wipe it down like this until you put it on, then light gel it so it doesn't scratch the matte finish.
In the meantime, I'll take it out, see if a second coat is needed, but I'll say, well, we'll leave that one out for now, put it back a little bit more, And in the meantime, we'll get out our decorating materials.
I'm going to suggest using two materials for the vines, as they are worth painting.
To get an even, nicely embedded surface for the vine, so no bumpy surface, you definitely need some material space.
You can always get the material lay-up by the thickness of the material.
So we can use, for example, paint gel and a little bit of fixative-free colour gel mixed together.
That way you have the density of the material because of the staining gel, and the flatness of the material because of the unfixed gel.
I'm just not going to use the staining gel alone, because it's going to be too thick and bumpy on the surface.
The reason I don't show you the non-fixing gel on its own is because it's going to run all over the place.
So you'd have to mix the two together to make an intermediate amount.
Well, let's say 50-50.
You'll get a good finish with that.
I can tell you straight away a bonus material that I've been testing out like this, and it's a painting gel, this one for Pearl, exceptionally, It's called UV Painting Gel, it's so much like a paint gel, but it's so soft that I can use it on its own, So there's no need to fiddle with this.
So that's pretty convenient, I think in salmon.
If you want to make this mixture in a salmon, I always did it by scooping out a larger amount into a sealable baggie container.
So you can always see my white in there like this, that's the ponta is gone.
I churned out a good amount, and then I'd let it sit for, say, a month, two months.
And if it's gone off, I've obviously remixed a very large amount.
So it's not an unlivable version, but I think it's just fine.
Now we'll take the tip out of the light then, and then actually a very, very important one is to use a good zero brush, And always when you're picking up the material, make sure you rotate the brush through the material, so the 3 feet of the brush, the 3 feet of the monster, should be written With the material, and then it depends on how much material you spoon onto the tip of the brush, how thick of a line you want.
You'll notice that we always start from the outside of the tendrils, because that's where the fabric is thicker and we'll thin the fabric inwards.
This seems to be achieved by both blurring our lines anyway, as we're running out of brush material, and by doing that, That I press down harder at the beginning, and as I move towards the base of the swatch, that I start to lift my brush a little bit at a time, And less pressing on the surface.
So I'm going to do a little bit of this.
I'm going to put it down here, always pulling the brush towards me and pulling a kunkori.
I can take another kunkori next to it in a couple of minutes, and I've drawn out a little tail with the tip of my brush.
Bikes will be braver now as this was a bit smaller.
Okay, I'll just drop one more one to the left, and then I can lose it in a couple of strings next to the other one.
I'm going to pick up a bigger dumpling, as I need more courage.
Dvaginate, I'm going to run it parallel, lock it in a center pond.
I'll pull a little tail up.
I'm going to take a little less fabric, also starting from the left, introducing it parallel to the farkinca.
Then I'm going to pull a tiny little tail out of this, curve it in.
Okay, I'm going to push it down hard so it starts out wide, take it slowly and bring it in between the two.
Upwards with just the tip of the brush, I don't push it down, I pull the tail out.
To get it in there as a finishing weed, we need to close this little in between section.
And the way we're going to do it is we're going to put a drop in here, I'm going to press it down, I'm going to apply it right away, just using the tip of the brush to draw the line, Then the farkinca from the far end.
I need a very tiny bit of material to take up my brush, a very tiny bit of a small section to paint here.
We've got another line in.
Okay, and then quickly.
I'm going to pick up a little bit more material again, we're going to pull it in here, we're going to finish the pattern, we're not going to leave any holes like this.
And farkinca.
And it's just down here.
We'll go around like this.
Farkinca.
And there might be a little bit more room here, so we'll just pull another one of these in here.
Up farkinca, idel two in between and we'll draw a tiny two, and we'll dupe this one here.
Good, and then this sample is ready.
Let's put it in the lamp.
Because it's a painting gel, it's also in a fixative, so we don't have to bother to gel it.
It's absolutely done.
I'll show you the end result, then we can move on.
Show More